Sometimes I will hear someone say something and from that little statement or thought the beginnings of an idea is born. Sometimes it’s a recipe. Sometimes it’s a craft. Sometimes it’s a gift. You get the idea.
Not so long ago we had stopped by to visit my grandparents for a bit. During that visit my Grandma mentioned that she didn’t really have Halloween decorations, just Thanksgiving decorations. I thought to myself there surely must be a way for my Grandma to have some cute decorations that would work for both Halloween and Thanksgiving. Something sort of fall-ish in nature.
Obviously this decor needed to be made by Maddy because what is better than adorableness made by a three year old cutie pie.
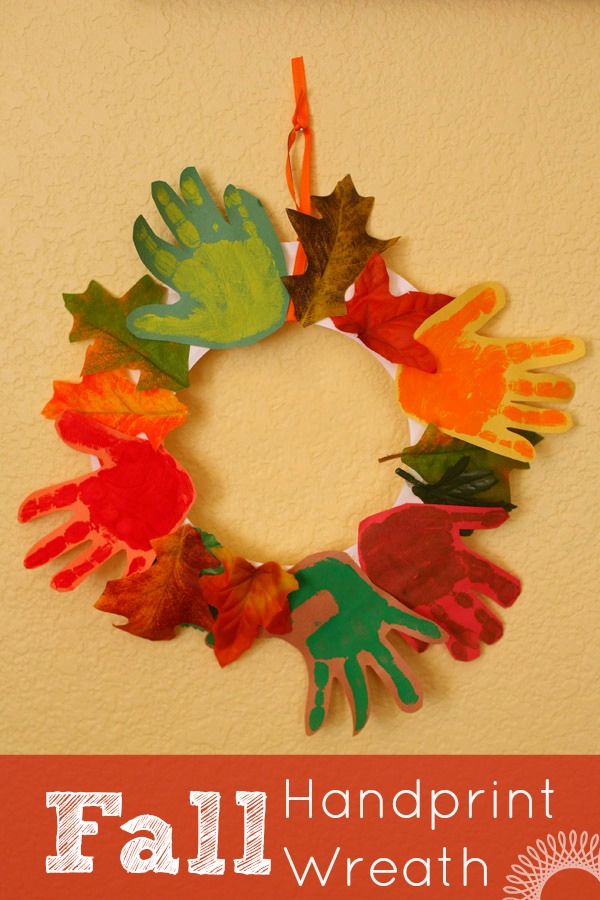
From this train of thought an adorable fall handprint craft idea was born: a wreath made of fall foliage and handprints.
This fall handprint craft idea is just as easy to make multiples of at the same time, as we did to give out to adoring grandmas, as it is to make one.
Supplies needs for Fall Handprint Wreaths:
- paper plates
- construction paper in red, orange, yellow, brown and green
- washable paint in red, orange, yellow, brown and green
- glue (Elmer’s worked fine but required patience, a glue gun would also work with lots of adult supervision)
- 1 to 2 bunches of fake fall colored leaves
- ribbon
- scissors
Step one: Cut a circle out of the middle of your paper plate creating a paper plate ring. This will be the base of your wreath.
Step two: Using a paint brush paint red paint onto one hand and make handprints on the orange, yellow, brown and green paper. Paint the other hand Brown then make hand prints on the red, orange, yellow and green paper. Wash the paint off to get cleaned up to make more hand prints. Continue painting hand with paint and making handprints with each of the remaining colors making sure to not make hand prints on paper of the same color. For example no red handprints on red paper. Only making hand prints on different colored paper makes the hand prints stand out much more.
Step three: Cut out handprints.
Step four: Pull leaves off of the bunches of fake leaves so they are ready to be glued to the wreath.
Step five: Tie a ribbon around the ring and make a loop. The ribbon will most likely get covered up as the leaves and handprint leaves get glued to the ring but the loop will remain to is as a way to hang the wreath when finished.
Step six: Glue fake leaves around the wreath. The number of fake leaves you use is up to you but I would suggest using at least 7 to 10. Tip: Placing the paper plate ring around the bottom of an over turned bowl helps keep the ring elevated from the table helping the leaves stay on the ring better while gluing and while the glue dries. Once the glue is dry the wreath can be removed over turned bowl and the leaves will stay attached.
Step seven: Glue handprint “leaves” to the wreath. Use at least one handprint of each color although more is always fine. The fake leaves are attached to the ring first to create and background color while the handprints “leaves” are glued on top to make sure that they stand out the most.
Step eight: Let the wreath set until all the glue is dried completely.
Step nine: Hang on the wall, a door, or anywhere else you choose and marvel at the cuteness.






16 comments
Beautiful craft! Love it.
So cute!
these are soo cute! i think i’ll make them w easy but all green for xmas…. im so ready to move on haha
[…] This post was mentioned on Twitter by Catherine , Catherine . Catherine said: New Evolving Mommy: Fall Hand Print Wreath http://goo.gl/fb/jP4UA […]
I love my wreath – thank you Maddy and mommy!
This wreath is so cute! And what a great project for a kid…they get to get messed with the paint. 🙂 Thanks!
OMG, wonderful kid…I never tried this before in my childdays, Lovely idea..
[…] *Evolving Mommy – simple fall handprint wreath […]
[…] Leaf and Handprint Wreath […]
[…] DIY project and photos credit to evolvingmotherhood.com […]
I loved this craft! We just uploaded a video of our own version of how we did it. Thank you so much for this fun idea!
[…] that we are going to dig into more deeply over the next few months. Our project this week is a hand print wreath. Ours didn’t turn out nearly as cute as the original, but it still makes me smile. I did […]
[…] Stick Scarecrow Craft 16/Fall Hand Print Wreath 17/DIY Thanksgiving Window […]
[…] | Rainbow Paper Plate Turkey | Clothespin Turkey Clothespin Turkey Roll | Keepsake Tablecloth | Fall Hand Print Wreath Turkey Play Dough | Coffee Filter Turkey | Pinecone […]
[…] Handprint Wreath via Evolving Mommy […]
[…] make a beautiful addition to your Thanksgiving decorating and a cute keepsake for the future. 3. Fall Handprint Wreath :: Evolving […]