Spring has sprung!
Hip hip hooray spring is here!
Spring is in the air!
Actually as I type this there is 4 or 5 inches of snow in the ground and more falling from the sky. More like blowing sideways as it falls from the sky. Alas, this is spring in Colorado. Days of 60 degree weather lead up to a big old snow storm. I’m not complaining though. We need it and honestly spring snow is the prettiest snow. Even though this sort of weather is par for the course in Colorado it doesn’t mean we haven’t had traditional spring things on the brain around here. A little rainbow, flower, or butterfly craft can brighten your day even if it is 25 degrees and snowing outside.
Also, crafting when it’s snowy is a must in this house. Madeline is a bouncy energy filled girl and crafting helps her release a little creative energy. And so we craft with sun, happy flowers, and pretty rainbows in mind and then share it with you! Maybe you have snow in your yard right now too or maybe you are enjoying one of those lovely spring showers that will surely be followed by a happy rainbow, or maybe you’re enjoying a warm and sunny spring day either way You can’t help but love spring right?

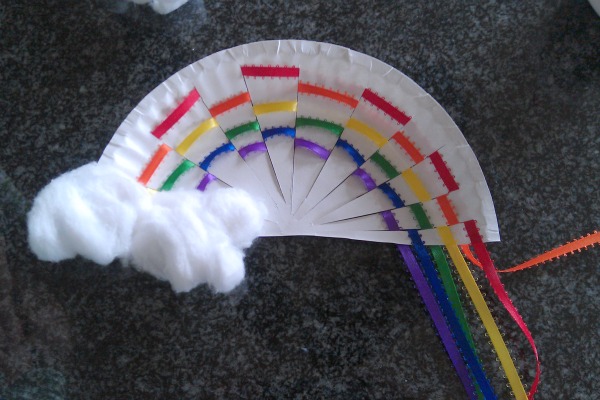
Supplies needed to make a Woven Ribbon Rainbow Craft
- Plain white paper plate
- Scissors
- A razor, exacto knife or other sharp cutting tool (you can also use scissors but a cutting tool will be easier)
- Red, orange, yellow, green, blue and purple ribbon
- Cotton balls
- School glue
How to make a Woven Ribbon Rainbow Craft
Step 1. Fold the paper plate in half and then cut along the fold.
Step 2. Cut slits fanning across the paper plate halves leaving about a half an inch space at the top edge and enough space at the center to be sure the slits do not intersect.
Step 3. Starting with the red ribbon weave through the slits threading the ribbon over one section through a slit and then under the next section and through the slit.
Step 4. Repeat step 3 with the orange, yellow, green, blue, and purple ribbons. Make sure to alternate starting over the first section and starting under the first section to create the woven appearance of the rainbow.
Step 5. Once each color is woven through the plate trim the ribbons. On one end trim the ribbon to leave about six inches of length. Trim the ribbons on the other end even with the edge of the paper plate.
Step 6. Glue the ribbons onto both sides of the paper plate to make sure they stay in place.
Step 7. Gently pull apart and fluff 1 or 2 cotton balls. Cover ends of the ribbon trimmed to match the edge of the paper plate by gluing the fluffed cotton balls over them. We decided to glue a fluffed cotton ball on the back too.
Step 8. Punch a small hole at the top center of the rainbow and string a length of ribbon through the hole and tie the ends. Your woven rainbow is now ready to hang and display.





5 comments
I love that even creatively-challenged mothers can lead their children through your crafts. Another winner!
I love this! This would be a great craft for the ILC at my son’s school – awesome for the kiddos to work on their fine motor skills.
Can’t wait to try this out – will keep the kiddos busy this week 🙂
Can anyone tell me how long the pieces of ribbon are? I have 13 children doing this project and I don’t want to over or under buy. Thanks!
[…] Woven Ribbon paper plate Rainbow […]